How to Adjust Pistol Sights for Better Accuracy and Target Alignment
Proper sight alignment plays a major role in shooting accuracy and consistent performance with a pistol. Many shooters focus on trigger control and stance, yet sight positioning remains equally important for reliable target results and improved confidence during practice or real shooting sessions.
Correct front and rear sight alignment ensures the point of impact matches the intended target. Small deviations in alignment can influence shot placement, making attention to detail essential for achieving tight groupings and consistent accuracy across different shooting distances and conditions when learning how to adjust pistol sights.
This adjustment process involves evaluating where shots land compared to the point of aim, then making controlled mechanical changes to windage and elevation settings. Careful incremental movements help maintain precision and prevent overcorrection during sight tuning on the range.
Shooting accuracy improves significantly through proper sight calibration combined with steady practice. Understanding sight behavior builds consistency, helping shooters develop better control over each shot and refine overall performance on the range.
Pistol Sight Types and Mechanics
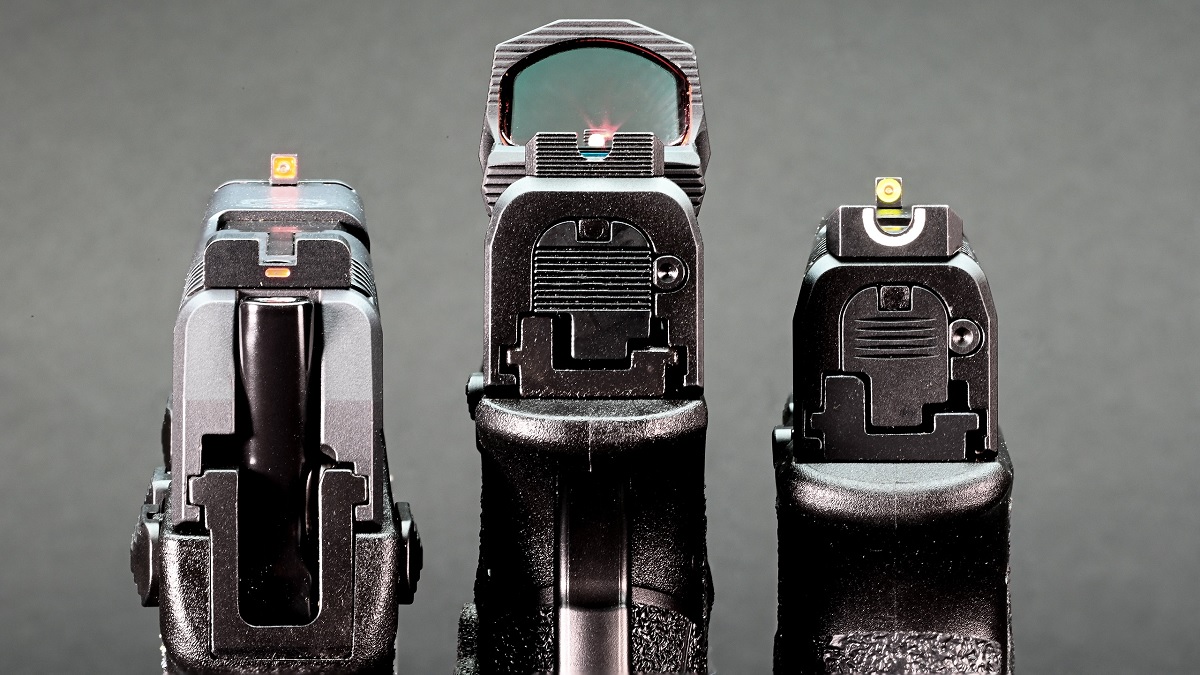
Understanding pistol sight types and how their mechanisms function is essential for improving shooting accuracy and consistency. Different sight systems are designed to support various shooting styles, lighting conditions, and user preferences. Whether used for training, sport shooting, or defensive purposes, sights directly influence how quickly and accurately a shooter can align their target. Learning how each type works also helps in making informed adjustments and improving overall control during aiming and firing sequences on the range.
Iron Sights and Their Basic Function
Iron sights are the most traditional and widely used sighting system on pistols. They typically consist of a front sight post and a rear notch, which must be aligned precisely to aim correctly. The shooter centers the front sight within the rear sight and levels the top edges to achieve accurate alignment. Small deviations in either direction can cause noticeable shifts in shot placement, especially at longer distances.
Most iron sights are adjustable for windage and elevation, allowing users to shift point of impact horizontally or vertically. Windage adjustments move the rear sight left or right, while elevation adjustments change the height of the front or rear sight depending on the design. These mechanical changes are usually made in small increments to maintain precision. Iron sights are valued for their simplicity, durability, and reliability in various shooting environments.
Fiber Optic and High-Visibility Sights
Fiber optic sights are designed to enhance visibility by using light-gathering rods that illuminate the sight picture in bright conditions. These sights help shooters acquire targets faster, especially in daylight or outdoor environments. The bright colored dots on the front and rear sights improve contrast, making alignment easier for both beginners and experienced shooters.
Unlike standard iron sights, fiber optic systems focus more on rapid target acquisition rather than precise long-range adjustments. While some models still offer windage and elevation tuning, their primary advantage lies in visibility and speed. These sights are commonly used in competition shooting and recreational range practice where quick sight alignment matters more than extreme precision at distance.
Night Sights and Low-Light Performance Systems
Night sights are designed for low-light or no-light shooting conditions, using tritium inserts or similar illumination technology. These sights glow without requiring batteries or external light sources, making them reliable in dark environments. The front sight typically appears brighter than the rear dots to help the shooter naturally focus on proper alignment.
Mechanically, night sights function similarly to traditional iron sights but are optimized for visibility rather than adjustment complexity. They still allow windage and elevation changes depending on the model, but their main purpose is consistent targeting in reduced lighting. This makes them a preferred choice for defensive firearms and tactical applications where visibility conditions can change rapidly.
Tools Needed for Adjusting Pistol Sights
Adjusting pistol sights requires the right set of tools to ensure accuracy, safety, and proper alignment during the process. Using incorrect or improvised tools can damage the sight system or reduce shooting precision. Having dedicated equipment makes adjustments smoother, more controlled, and consistent. Whether working with iron sights or upgraded sight systems, each tool plays a specific role in achieving correct windage and elevation alignment.
Sight Adjustment Tools and Basic Gunsmith Equipment
A sight adjustment tool is one of the most important items needed for making precise changes to pistol sights. These tools are designed specifically to push or rotate sights in controlled increments without damaging the firearm. Depending on the pistol model, you may need a universal sight pusher or a manufacturer-specific tool that matches the slide design. These tools help maintain even pressure during adjustment, reducing the risk of misalignment.
Basic gunsmith equipment also plays a supporting role in sight adjustments. A small bench vise with protective padding helps secure the slide safely while working. Brass or nylon punches are often used for drifting sights without scratching metal surfaces. A non-marring hammer ensures controlled tapping force when fine adjustments are needed. Each tool contributes to precision handling, especially when working with tight factory-installed sights that require careful movement.
Measuring and Alignment Tools for Accuracy
Measuring tools are essential for verifying sight alignment and ensuring consistent results after adjustments. A caliper can be used to measure sight position changes in small increments, helping shooters maintain balanced windage and elevation settings. Even slight inaccuracies can affect shot grouping, making precision measurement important during setup and testing phases.
A shooting rest or sandbag setup also helps evaluate sight performance after adjustments. By stabilizing the pistol during test firing, shooters can better observe point-of-impact changes without human error affecting results. A target grid or marked paper target further assists in tracking shot placement and diagnosing whether additional adjustments are necessary. These tools together create a structured approach to sight calibration, ensuring reliable and repeatable accuracy improvements.
Step by Step Process to Adjust Rear Sight
Adjusting a rear pistol sight requires a careful and structured approach to ensure accuracy and consistency in shot placement. The process involves preparation, controlled mechanical changes, and repeated verification through test firing. Each adjustment should be small and intentional, as even minor movements can significantly affect point of impact. Understanding how the rear sight influences windage and alignment is essential for achieving proper target accuracy. A steady method helps avoid overcorrection and improves long-term shooting performance on the range.
Safety and Setup Before Adjustment
Before making any changes to the rear sight, ensuring the firearm is completely unloaded is the most important step. Remove the magazine, check the chamber visually and physically, and confirm the pistol is safe to handle. This creates a controlled environment where adjustments can be made without risk of accidental discharge or unsafe handling during the process.
Once safety is confirmed, place the pistol on a stable surface or use a padded vise to secure the slide. Proper stability prevents unwanted movement while adjusting the sight. Good lighting is also important so the shooter can clearly see sight alignment marks and small adjustment points on the rear sight assembly.
Next, establish a baseline by firing a group of shots at a fixed target distance. This helps identify where the bullets are landing in relation to the point of aim. Without this reference, adjusting the rear sight becomes guesswork rather than a precise correction process.
Finally, analyze the shot grouping carefully before making any changes. Determine whether the impact is drifting left or right, which indicates windage correction needs, or if vertical shift is present. This evaluation ensures each adjustment has a clear purpose and direction.
Adjusting Windage on Rear Sight
Windage adjustment on the rear sight controls horizontal bullet placement, shifting the point of impact left or right. Most rear sights are drift-adjustable or feature small screw-based mechanisms. Using a sight pusher tool or a non-marring punch helps move the sight gradually without damaging the slide or sight body.
Make only small adjustments at a time, as even slight movement can significantly change shot placement. If shots are hitting left of the target, the rear sight is typically moved in the opposite direction to correct alignment. Careful, incremental changes ensure accuracy is refined rather than overcorrected.
After each adjustment, it is important to re-tighten any locking components if applicable. Some sights may loosen during movement, so securing them ensures consistency during test firing. A stable setup prevents unwanted drift between adjustments.
Once changes are made, fire another controlled group of shots to evaluate improvement. Comparing new shot placement with the original grouping helps confirm whether further adjustment is needed or if windage is properly centered.
Adjusting Elevation and Confirming Alignment
Elevation adjustment controls the vertical point of impact and is typically managed by altering either the front or rear sight depending on the pistol design. Some rear sights include elevation screws, while others require combined sight adjustments for vertical correction.
To raise or lower impact, small controlled movements should be made in the correct direction according to the sight system. Adjusting too far in one step can shift grouping excessively, making it harder to re-center accuracy. Precision and patience are essential during this stage.
After each elevation change, secure the sight if necessary and ensure all components remain tightly fixed. Loose fittings can cause inconsistent shot patterns, making it difficult to assess true alignment changes during testing.
Step by Step Process to Adjust Front Sight
Adjusting the front sight of a pistol is a precise process that directly affects elevation and overall point of impact. Unlike the rear sight, the front sight often plays a key role in vertical alignment and can also influence horizontal correction depending on the firearm design. A careful, step-by-step approach is necessary to avoid misalignment. Proper handling, controlled movement, and consistent testing ensure the front sight is accurately positioned for improved shooting performance.
Preparing the Pistol and Identifying Sight Type
Before adjusting the front sight, ensure the pistol is completely unloaded and safe to handle. Remove the magazine, clear the chamber, and double-check visually and physically. Safety preparation is essential because front sight adjustments often require direct handling of the slide and tight components.
Next, identify the type of front sight installed on the pistol. Some front sights are dovetail-mounted and require drifting tools, while others are fixed or secured with screws. Understanding the mounting system determines the correct adjustment method. Using the wrong approach can damage the sight or slide, making identification an important first step.
Once the sight type is confirmed, secure the slide in a padded vise or stable holder. Proper stabilization prevents unnecessary movement during adjustment. Good lighting is also important to clearly see sight edges, alignment marks, and movement direction. This setup ensures accuracy during each controlled adjustment step.
Finally, review previous shot groupings to determine the direction of correction needed. If shots are consistently low or high, the front sight adjustment will help correct elevation. This evaluation provides a clear direction before any physical changes are made.
Making Controlled Elevation Adjustments
Elevation adjustments on the front sight typically involve raising or lowering the sight depending on the point of impact. On many pistols, lowering the front sight raises the point of impact, while raising it lowers the impact. Understanding this relationship is essential before making any movement.
For dovetail-mounted sights, a sight pusher tool or non-marring punch is used to carefully drift the sight. Movements should be extremely small and gradual to prevent overcorrection. Even a slight shift can significantly affect shot placement, especially at longer distances.
During adjustment, maintain steady pressure and avoid forcing the sight too quickly. If resistance is high, stop and reassess tool positioning to avoid damaging the slide or sight base. Patience is critical to achieving smooth and accurate alignment.
After each adjustment, re-secure the sight and inspect alignment visually. Ensure it remains centered and stable before proceeding to test firing. This step prevents unintended movement during shooting evaluation.
Testing and Fine-Tuning Alignment
Once the front sight adjustment is complete, the next step is controlled test firing. Use a consistent distance and stable shooting position to evaluate changes in elevation. A bench rest or sandbags help eliminate shooter error, allowing for more accurate assessment of sight corrections.
Fire a small group of shots and observe the point of impact relative to the target center. If shots remain too high or low, further minor adjustments may be necessary. Each correction should be minimal to avoid disrupting the overall alignment balance.
Between adjustments, always recheck the sight position physically. Ensure it has not shifted unintentionally due to recoil or handling. Maintaining consistency in placement is essential for reliable results across multiple test rounds.
Repeat the process until shot groups consistently align with the intended point of aim. This iterative approach ensures the front sight is properly calibrated for both accuracy and repeatability in real shooting conditions.
Maintenance and Long Term Sight Accuracy
Maintaining pistol sights over time is essential for preserving consistent accuracy and reliable performance. Even properly adjusted sights can shift due to recoil, handling, or environmental exposure. Regular inspection, cleaning, and minor recalibration help ensure the sight system remains aligned. A disciplined maintenance routine prevents gradual drift and supports long-term shooting precision in both practice and field use.
Regular Inspection and Cleaning Practices
Routine inspection of pistol sights helps identify early signs of misalignment or wear. Over time, recoil and repeated handling can slightly loosen sight components, especially on adjustable or dovetail-mounted systems. Checking alignment visually before and after shooting sessions ensures that any movement is detected early. This simple habit helps maintain consistent accuracy without waiting for noticeable performance issues.
Cleaning also plays an important role in sight maintenance. Dust, carbon buildup, and debris can affect visibility and make alignment less precise. Using a soft brush or cloth to gently clean around the front and rear sights helps maintain a clear sight picture. Avoid harsh tools that may scratch or damage sight surfaces, as even minor imperfections can impact focus during aiming.
Additionally, inspecting mounting screws or drift-fit positions ensures the sights remain securely fixed. If any looseness is detected, it should be corrected immediately using proper tools. Tight and stable sight installation is key to preventing gradual drift that affects shot placement over time.
Preserving Accuracy Through Recalibration and Care
Long-term sight accuracy requires occasional recalibration, especially after heavy use or accidental impact. Even small shifts in sight position can accumulate into noticeable changes in point of impact. Periodic test firing at known distances helps confirm whether adjustments are still holding true or need fine tuning.
Environmental conditions such as humidity, temperature changes, and rough handling can also influence sight stability. Proper storage in a protective case reduces exposure to these factors and helps maintain alignment. Keeping the firearm in a controlled environment prevents unnecessary stress on sight components.
When recalibration is needed, adjustments should always be made gradually and based on confirmed shooting results. Avoid frequent unnecessary changes, as over-adjustment can reduce consistency. A balanced approach between monitoring and minimal correction ensures the sight system remains dependable for long-term accuracy.
People Also Asked
How Do You Know If Your Pistol Sights Need Adjustment?
You usually notice your pistol sights need adjustment when your shots consistently land away from your point of aim. If your groupings are tight but shifted left, right, high, or low, the issue is likely sight alignment rather than shooting technique. You should also consider adjustment after changing ammunition, switching grip style, or installing new sights. Before making changes, confirm your fundamentals are solid, since poor trigger control or stance can mimic sight problems and lead you to adjust when it is not necessary?
Start by shooting controlled groups at a fixed distance. If the pattern stays consistent in one direction, that is a clear sign your sights need correction.
What Tools Do You Need To Adjust Pistol Sights?
To adjust pistol sights properly, you will need a few basic but important tools. A sight pusher tool is the most precise option for moving rear sights without damaging them. A small gunsmith screwdriver set may be required for adjustable sights. A stable shooting rest or sandbags help you eliminate human error during testing. You should also use a clear target to evaluate shot placement accurately.
Some pistols may also require a brass punch and hammer for drift adjustments. Always choose tools that match your sight type to avoid scratching or bending components?
Using proper tools ensures accuracy and prevents unnecessary wear on your firearm.
How Do You Adjust Rear Pistol Sights Correctly?
To adjust rear sights, you first determine how your shots are grouping compared to your aim point. If shots are hitting left, move the rear sight slightly to the left, and if they hit right, move it to the right. For elevation issues, adjust upward or downward depending on impact. Always make small, gradual changes rather than large movements.
After each adjustment, fire a new group of shots to confirm the change. This step-by-step method helps you avoid overcorrection and keeps your adjustments precise?
Consistency and patience are key to achieving proper zero alignment.
How Do You Adjust Front Pistol Sights Safely?
Front sight adjustments are less common and usually involve fixed sights that require drifting rather than turning screws. If your shots are consistently off, the front sight may need to be moved slightly in the opposite direction of the error. For example, if shots hit left, the front sight may need to move right.
You should use a proper sight pusher or brass tool to avoid damaging the sight base. Never force the sight too quickly, as this can affect alignment and stability?
Always test your adjustments at the range before making further changes.
What Is The Best Distance For Zeroing Pistol Sights?
The best distance for zeroing pistol sights depends on your intended use, but many shooters start at 10 to 25 yards. This range provides a good balance between precision and real-world application. Shorter distances help you quickly identify major alignment issues, while longer distances confirm accuracy consistency.
You should fire multiple-shot groups rather than single shots to get reliable results. Adjust your sights based on the center of the grouping, not individual shots?
Once zeroed at your chosen distance, your pistol should deliver consistent accuracy under similar conditions.
Why Do Shots Move After Adjusting Pistol Sights?
Shots may shift after adjusting pistol sights due to overcorrection, inconsistent shooting technique, or environmental factors. Even small changes in grip pressure or trigger pull can alter impact points. Sometimes the adjustment itself is too large, causing the group to move beyond the intended correction point.
It is also possible that your ammunition or barrel condition affects consistency. That is why you should always confirm changes with multiple shot groups rather than relying on one?
Careful, incremental adjustments reduce this issue and improve long-term accuracy.
How Often Should You Check Your Pistol Sight Alignment?
You should check your pistol sight alignment regularly, especially after heavy use, cleaning, or transportation. Even strong recoil and handling can slightly shift sights over time. If you notice changes in accuracy, it is a good idea to recheck your zero before making any assumptions.
For competitive or defensive use, more frequent checks are recommended to maintain reliability. Environmental conditions and ammunition changes can also affect alignment?
Routine inspection helps you maintain consistent accuracy and ensures your pistol performs as expected in every situation.
Final Words
Proper sight alignment plays a critical role in improving shooting accuracy, and understanding the adjustment process helps build consistency and confidence. Each step, from identifying shot patterns to making controlled mechanical changes, contributes to better overall performance. Careful attention to detail ensures that even small corrections lead to noticeable improvements on target.
Learning the correct method for tuning both front and rear sights allows shooters to adapt their firearm to different distances and shooting conditions. Whether dealing with windage or elevation, precision and patience are essential for achieving reliable results. Mastering these adjustments reduces errors and helps develop stronger shooting fundamentals over time.
Regular practice and inspection further reinforce accuracy by keeping sights properly aligned during long-term use. With consistent evaluation and minor corrections when needed, performance remains stable and dependable. A clear understanding of how to adjust pistol sights supports better control, improved grouping, and overall shooting efficiency in real-world scenarios.