How to Remove Glock Rear Sight Safely Without Damaging Your Slide
Removing a rear sight from a Glock may seem challenging at first, but the process becomes much easier with the right tools and a clear understanding of each step. Many gun owners replace factory sights to improve accuracy, install night sights, or upgrade to fiber optic options. Taking your time helps prevent damage to the slide and ensures a clean installation later.
Learning how to remove glock rear sight starts with preparing a safe workspace and using the proper sight removal tool. A careful approach reduces the chance of scratching the slide or putting unnecessary pressure on the sight itself. Small details make a big difference during the process.
Every Glock model follows a similar design, making the basic removal method straightforward for most owners. Paying attention to alignment and applying steady pressure leads to better results than forcing the sight out.
This guide walks through each step in a practical way, helping you complete the job with confidence while keeping your firearm in excellent condition for future use.
How to Remove Glock Rear Sight
Removing the rear sight from a Glock requires patience, the proper tools, and careful handling. A well-prepared workspace helps prevent accidental damage while making the task much easier. Following the correct procedure step by step allows you to remove the sight safely and prepares the slide for installing a new sight with better accuracy and fit.
Gather the Right Tools Before You Start
Before removing the rear sight, collect all the tools needed for the job. A Glock-compatible sight pusher is the safest option because it applies even pressure across the sight. You should also prepare a padded work surface, a microfiber cloth, safety glasses, and a nylon cleaning brush.
Having everything ready before you begin saves time and keeps the process organized. Avoid using steel punches or other improvised tools that can scratch the slide or damage the sight. Proper preparation reduces unnecessary interruptions and helps you work more confidently from start to finish.
Verify the Glock Is Completely Unloaded
Safety is the most important step before working on any firearm. Remove the magazine and lock the slide open to inspect the chamber both visually and physically. Confirm that no ammunition is present before continuing with the removal process.
After verifying the firearm is unloaded, separate the slide from the frame according to the manufacturer’s instructions. Place the slide on a stable, padded surface to prevent movement while using the sight removal tool. A secure setup gives you better control and minimizes the chance of accidental damage.
Remove the Rear Sight Using a Sight Pusher
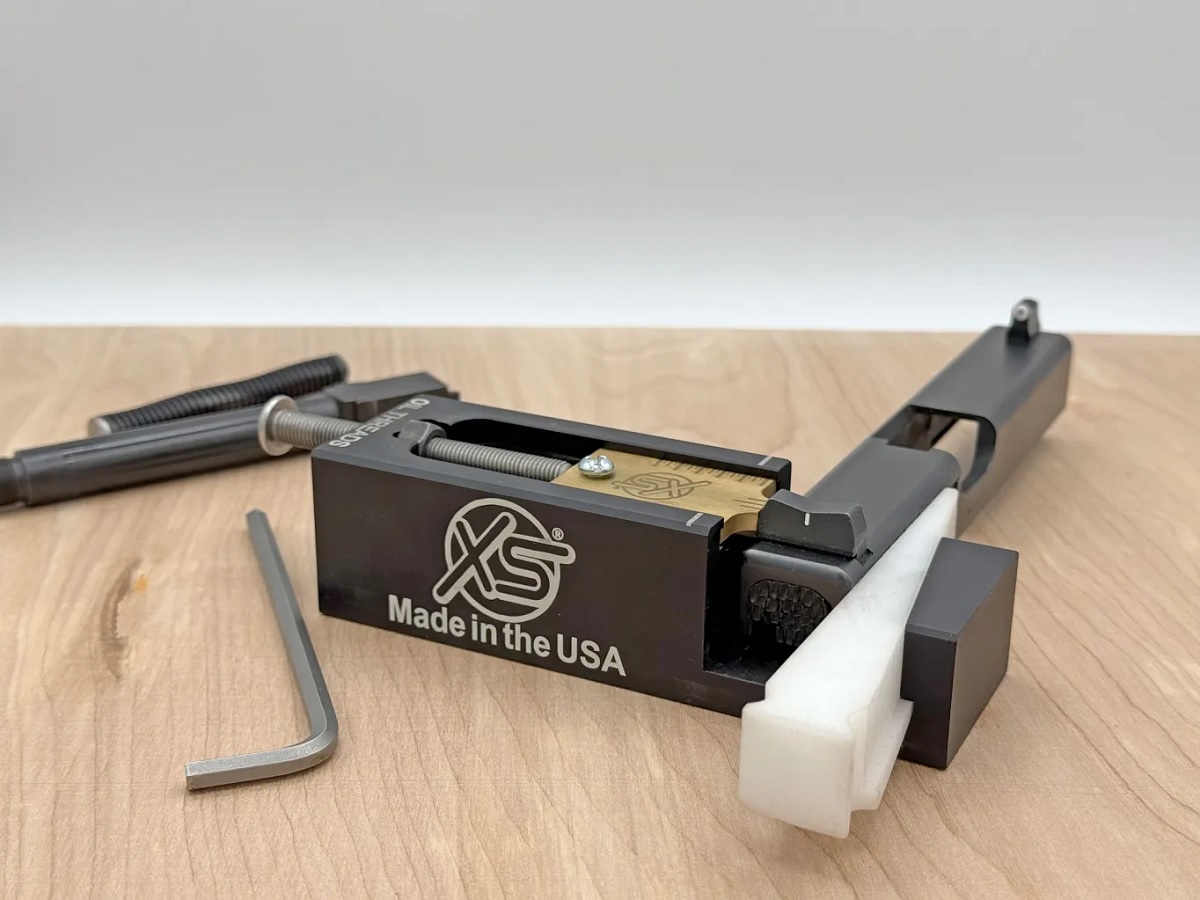
Secure the slide inside the sight pusher and make sure it is properly aligned before applying pressure. Position the pusher against the base of the rear sight rather than the upper edge. This alignment allows the sight to move smoothly through the dovetail without placing uneven stress on the slide.
Turn the adjustment handle slowly and apply steady pressure until the rear sight begins moving. Continue at a controlled pace until the sight slides completely out of the dovetail. Rushing the process can create unnecessary resistance and increase the chance of damaging the firearm.
Clean and Inspect the Dovetail Slot
After removing the rear sight, inspect the dovetail slot for dirt, metal shavings, or leftover thread-locking compound. A clean dovetail provides a better surface for installing a replacement sight and helps ensure proper alignment during installation.
Use a nylon brush or a clean microfiber cloth to remove debris without scratching the slide. Check the edges of the dovetail for wear or burrs that could affect the fit of the new sight. Spending a few extra minutes cleaning and inspecting the slide helps create a smoother installation process and improves the overall result.
Best Tools for Removing a Glock Rear Sight
Using the correct tools makes removing a Glock rear sight safer, easier, and more precise. Quality tools reduce the risk of scratching the slide, damaging the sight, or creating alignment issues during replacement. Choosing equipment designed specifically for Glock pistols also improves efficiency and helps you complete the task with greater confidence.
Glock Sight Pusher Tool
A Glock sight pusher is widely considered the best tool for removing a rear sight because it applies steady, controlled pressure across the dovetail. Unlike striking the sight with a hammer, a sight pusher moves the sight gradually, reducing stress on both the slide and the sight itself. Many models include adjustable supports that keep the slide firmly in place throughout the removal process.
Look for a sight pusher made from durable steel or aluminum with smooth adjustment threads and a stable clamping system. A quality tool works with multiple Glock models and often supports sight installation as well as removal. Investing in a reliable sight pusher can save time and help prevent costly damage to your firearm.
Bench Vise With Protective Jaw Pads
A bench vise provides a secure way to hold the slide while working, especially when combined with rubber, nylon, or polymer jaw pads. The protective pads grip the slide firmly without scratching its finish, allowing you to maintain better control during sight removal. A stable work setup also reduces unwanted movement that could affect accuracy.
Avoid tightening the vise excessively because too much pressure can damage the slide or distort its shape. Tighten only enough to prevent movement while keeping the slide properly aligned. Using a bench vise together with the appropriate sight removal tool creates a safer and more comfortable working environment.
Nylon Punch and Small Gunsmith Hammer
A nylon punch paired with a lightweight gunsmith hammer can be useful when a dedicated sight pusher is unavailable. The softer nylon material helps reduce the chance of marring the slide compared with steel punches. Gentle, controlled taps encourage the rear sight to move through the dovetail without creating unnecessary impact on the firearm.
This method requires patience and careful alignment throughout the process. Striking too hard or using the wrong angle may damage the sight or leave visible marks on the slide. Keeping the punch square against the base of the sight improves control and allows gradual movement instead of sudden shifts.
Cleaning and Support Accessories
Several supporting tools help make the removal process cleaner and more efficient. A microfiber cloth protects the slide from scratches while a nylon brush removes dirt, metal particles, and old thread-locking residue from the dovetail after the rear sight has been removed. Safety glasses protect your eyes from small debris that may become loose during the procedure.
Good lighting also plays an important role when working with small firearm components. A bright work light makes it easier to monitor the movement of the rear sight and inspect the dovetail for wear or debris. Keeping all your tools organized before starting the job reduces interruptions and helps the removal process proceed smoothly from beginning to end.
Common Problems When Removing a Glock Rear Sight
Removing a Glock rear sight is usually straightforward with the right tools, but several issues can make the process more difficult than expected. Tight factory installation, improper tool selection, and poor alignment are among the most common challenges. Understanding these problems before you begin helps reduce frustration and lowers the risk of damaging the slide or the sight.
Rear Sight Is Extremely Tight
Many factory-installed Glock rear sights are fitted very tightly into the dovetail, making them difficult to move on the first attempt. This snug fit is designed to keep the sight securely in place during regular use, but it also means additional patience is often required during removal. Applying excessive force rarely solves the problem and may damage the sight or slide.
Using a quality sight pusher allows you to apply slow, even pressure instead of sudden force. Make sure the slide is properly secured and the tool is correctly aligned before turning the adjustment handle. Maintaining consistent pressure gives the sight a better chance of moving smoothly through the dovetail without unnecessary stress on the firearm.
Slide Gets Scratched During Removal
Surface scratches are one of the most common problems when removing a Glock rear sight. They usually occur because of metal tools slipping, poor slide support, or direct contact between the tool and the firearm’s finish. Even minor scratches can affect the appearance of the slide and are often difficult to repair completely.
Protecting the slide with a padded work surface and using tools designed specifically for Glock sights greatly reduces this risk. Check the alignment before applying pressure and avoid rushing through the process. Careful positioning helps keep the tool centered on the rear sight instead of allowing it to contact the slide itself.
Sight Pusher Becomes Misaligned
A sight pusher only works effectively when it is correctly positioned. An improperly aligned tool can place uneven pressure on the rear sight, causing it to bind inside the dovetail or move at an angle. This increases the effort required for removal and may damage both the sight and the slide.
Before applying pressure, inspect the slide from multiple angles to confirm it sits level inside the tool. Adjust the clamps until the pusher contacts the base of the rear sight evenly. Taking a few extra moments to verify alignment often prevents much larger problems later in the removal process.
Dovetail Contains Dirt or Residue
Old thread-locking compound, carbon buildup, and accumulated dirt inside the dovetail can make rear sight removal more difficult than expected. These materials create additional resistance and may prevent the sight from sliding smoothly. Ignoring this buildup often leads to unnecessary force during removal.
Inspect the dovetail as the sight begins to move and clean away visible debris once the sight has been removed. A nylon brush and clean microfiber cloth work well for removing residue without harming the slide. Keeping the dovetail clean improves the fit of the replacement sight and makes future maintenance much easier.
How to Install a New Glock Rear Sight
Installing a new Glock rear sight requires careful alignment, proper tools, and steady pressure to achieve a secure fit. A precise installation helps improve sight accuracy while preventing unnecessary wear on the slide. Preparing the slide and following each step in the correct order makes the installation process smoother and reduces the chance of damaging the new sight.
Prepare the Slide and Rear Sight
Begin by making sure the Glock slide is clean and free from dirt, metal shavings, or leftover thread-locking compound. Use a nylon brush and a microfiber cloth to clean the dovetail thoroughly before installing the new rear sight. A clean surface allows the sight to move into position more smoothly and ensures a more secure fit.
Inspect the new rear sight for any manufacturing defects or burrs before installation. Compare its dimensions with the original sight to confirm compatibility with your Glock model. Keeping both the slide and the sight clean helps prevent binding and creates a more consistent installation process from start to finish.
Position the Rear Sight Correctly
Place the new rear sight into the dovetail by hand and ensure it starts evenly from the correct side. The sight should enter the dovetail without excessive force, although a snug fit is completely normal. Keeping the sight level at the beginning prevents it from becoming crooked as it moves across the slide.
Take a moment to verify the sight is centered within the dovetail opening before using any installation tool. Proper alignment at this stage reduces resistance and minimizes the chance of scratching the slide. Small adjustments made early in the process often save time later when fine-tuning the final position.
Use a Sight Pusher for Installation
A Glock-compatible sight pusher provides the safest and most accurate way to install a new rear sight. Secure the slide inside the tool and align the pusher with the base of the sight before applying pressure. Turn the adjustment handle slowly, allowing the sight to move gradually through the dovetail while remaining level throughout the installation.
Avoid forcing the sight into place with sudden movements or excessive pressure. Instead, monitor its progress from both sides of the slide to ensure even movement. Controlled pressure helps protect the slide’s finish and keeps the rear sight properly aligned during installation.
Check Alignment and Secure the Sight
After the rear sight reaches its approximate position, inspect both sides of the slide to confirm it is centered. Small adjustments can be made with the sight pusher until the spacing appears equal on each side. Accurate alignment is important because even a slight offset may affect your point of aim during shooting.
Once the sight is correctly positioned, tighten any manufacturer-recommended set screw using the appropriate tool, provided your replacement sight includes one. Apply thread locker only when recommended by the sight manufacturer, and allow it to cure according to the product instructions. Finish by inspecting the installation carefully to ensure the rear sight sits securely in the dovetail without movement.
Tips to Protect Your Glock Slide During the Process
Protecting your Glock slide during rear sight removal or installation helps preserve its finish and prevents unnecessary damage. Careful preparation, proper tool selection, and steady handling all contribute to a safer workflow. Taking a few extra precautions before starting the job can reduce the risk of scratches, dents, and alignment issues while keeping the slide in excellent condition.
Use the Right Tools for the Job
Using Glock-specific tools is one of the best ways to protect the slide during the process. A quality sight pusher applies even pressure across the rear sight, reducing the chance of slipping or creating marks on the slide. Tools designed for Glock pistols also provide better support, making the removal or installation process more controlled.
Avoid using screwdrivers, steel punches, or other improvised tools that are not intended for sight work. These tools can easily slip and damage the slide’s finish. Investing in the correct equipment improves precision and helps prevent cosmetic or structural damage throughout the project.
Secure the Slide on a Protected Surface
Place the slide on a padded workbench or secure it in a bench vise fitted with rubber or nylon jaw pads. A protected surface prevents direct metal-to-metal contact and keeps the slide from moving while you work. Stability allows you to apply pressure more accurately and reduces the chance of accidental slips.
Before tightening the vise, check that the slide is sitting straight and is supported evenly. Apply only enough pressure to hold it securely without squeezing it excessively. Proper support keeps the slide stable while protecting its finish from unnecessary wear or scratches.
Apply Steady and Controlled Pressure
When using a sight pusher, turn the adjustment handle slowly instead of forcing the rear sight through the dovetail. Controlled pressure allows the sight to move gradually while reducing stress on both the slide and the sight itself. Rushing the process often increases the risk of slipping tools or uneven movement.
Watch the alignment carefully as the sight moves across the dovetail. Stop and reposition the tool whenever the sight begins moving unevenly or encounters unusual resistance. Taking your time helps maintain control and minimizes the possibility of damaging the slide.
Keep the Slide Clean Throughout the Process
Dust, metal particles, and old thread-locking compound can create unnecessary friction during sight removal or installation. Wipe the slide with a clean microfiber cloth before you begin and inspect the dovetail for any debris that could interfere with smooth movement. A clean working surface also makes it easier to notice potential problems early.
After removing the rear sight, clean the dovetail with a nylon brush to remove any remaining residue. Inspect the slide for light marks or debris before installing the new sight. Keeping the slide clean throughout the entire process helps maintain its appearance and supports a more accurate and secure sight installation.
FAQs
How Do You Remove a Glock Rear Sight Safely?
You should begin by making sure your Glock is completely unloaded before starting any work. Remove the magazine, inspect the chamber, and separate the slide from the frame. Working only with the slide provides better access and reduces unnecessary risk during the process.
Next, secure the slide in a padded vise or a Glock-compatible sight pusher. Apply slow, even pressure to move the rear sight through the dovetail. Avoid forcing the sight with excessive impact, as careful handling protects the slide and makes the removal process much smoother.
What Is the Best Tool to Remove a Glock Rear Sight?
The best tool for removing a Glock rear sight is a dedicated Glock sight pusher. This tool applies controlled pressure, allowing the sight to slide out of the dovetail without damaging the slide. Many professional gunsmiths prefer this method because it provides consistent results and minimizes the chance of scratches.
You can also use a nylon punch and a small gunsmith hammer when a sight pusher is unavailable. This method requires greater precision and patience. Using the proper tool helps you complete the job more efficiently while reducing the risk of damaging your firearm.
Can You Remove A Glock Rear Sight Without A Sight Pusher?
Yes, you can remove a Glock rear sight without a sight pusher by using a nylon or brass punch and a lightweight gunsmith hammer. This method requires careful positioning and gentle taps to move the sight gradually through the dovetail without harming the slide.
You should avoid using steel punches or excessive force because they can leave permanent marks or damage the rear sight. Working on a padded surface and maintaining proper alignment throughout the process improves your chances of completing the removal successfully.
Why Is My Glock Rear Sight So Difficult To Remove?
A Glock rear sight often feels difficult to remove because factory-installed sights are designed with a tight friction fit. This secure fit prevents the sight from shifting during regular use, but it also makes removal more challenging. Dirt, debris, or thread-locking residue can increase resistance even further.
Using a high-quality sight pusher allows you to apply steady pressure instead of sudden force. Taking your time and ensuring proper alignment helps the sight move more smoothly. Patience is usually the key to removing a tightly fitted rear sight without causing damage.
Can Removing A Glock Rear Sight Damage The Slide?
Yes, damage can occur when the wrong tools or improper techniques are used. Scratches, dents, and deformed dovetails are common problems caused by excessive force or poorly aligned tools. These issues can affect both the appearance and performance of your Glock slide.
You can greatly reduce these risks by using Glock-specific tools, protecting the slide with padded supports, and applying slow, even pressure. Checking alignment frequently during the removal process also helps prevent accidental damage and keeps the slide in excellent condition.
Do You Need To Remove The Slide Before Taking Off The Rear Sight?
Yes, removing the slide before working on the rear sight is strongly recommended. Separating the slide from the frame provides better access to the rear sight and allows you to secure the slide properly in a sight pusher or padded vise. This setup improves both safety and accuracy.
Working only with the slide also makes it easier to inspect the dovetail and clean it after the rear sight has been removed. Following this approach helps simplify the entire process while reducing unnecessary strain on the firearm.
What Should You Do After Removing A Glock Rear Sight?
After removing the rear sight, inspect the dovetail carefully for dirt, metal shavings, or leftover thread-locking compound. Cleaning the slot with a nylon brush and a microfiber cloth creates a smooth surface for installing a replacement sight. A clean dovetail also helps improve the fit of the new sight.
You should also examine the removed sight and the slide for signs of wear or damage before continuing. Taking a few extra minutes to clean and inspect these components helps ensure a more accurate installation and supports long-term reliability.
Final Thoughts
A careful approach makes the entire process much safer and helps protect your Glock from unnecessary damage. By using the correct tools, securing the slide properly, and working with patience, you can complete the job with confidence. Learning how to remove glock rear sight also prepares you for future sight upgrades, maintenance, or repairs.
Paying attention to proper alignment and avoiding common mistakes will save time and prevent costly issues. Whether you use a dedicated sight pusher or other recommended tools, following the correct steps ensures the rear sight comes out cleanly without harming the slide or the sight itself. Taking your time is always better than forcing the part loose.
Once you understand how to remove glock rear sight, the task becomes much more manageable. Always double-check that the firearm is unloaded before starting, inspect the dovetail after removal, and install the new sight carefully for the best accuracy. With the right preparation and technique, you can achieve professional-quality results while keeping your Glock in excellent condition.